
Abbotsford

(N: scale 2mm/ft, track gauge 9mm)
Set in the early 1960s, Abbotsford is a fictional town on the Cheshire Lines Committee route between Manchester and Liverpool. The layout is a double track mail line with a through station which has four platform roads two of which are bays. There is also an engine shed and small goods yard which can be shunted independently thus adding extra interest to the trains passing on the main line. More details about its true life/fictional scenario can be found on the display board next to the layout.
Abbotsford has appeared at many exhibitions up and down the country, but this year the owner has agreed to it being one of the children’s layouts in Hall B. It’s suitable for older children who will have to solve a tricky little problem. They will have to move the engine from a train which arrives at one of the bay platforms and replace it with another engine, so that the train can depart in the opposite direction.
Photo © Ian Coe
back to top
Antwerpse Viskade
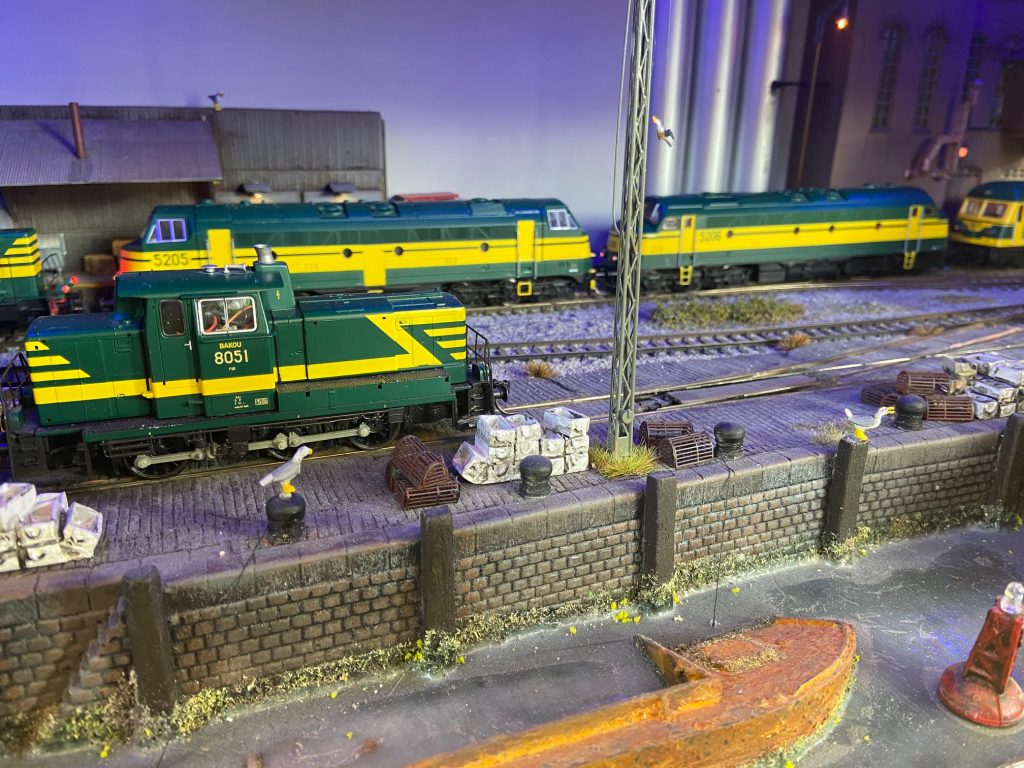
(HO: 3.5mm/ft.16.5mm track gauge)
The layout’s name translates as Antwerp’s fishing quay and this small HO diorama is a little snapshot of life on the quayside in Antwerp.
Photo © D Paylor
back to top
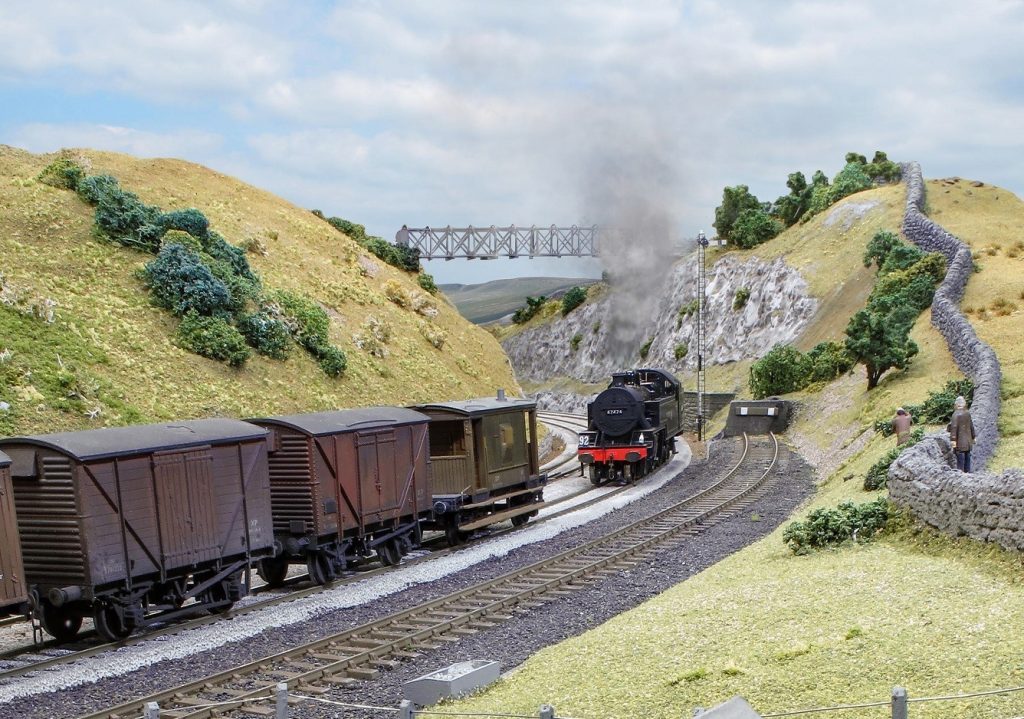
Boston Lodge Junction

(SM32: 16mm/ft, 32mm track gauge)
This layout is making its debut at the exhibition.
Those familiar with the Ffestiniog and Welsh Highland Railways will be able to identify much of the stock operating this 16mm/foot micro layout. Many features of the setting will also be recognisable to those who know Boston Lodge Halt. To justify the intensive working expected in exhibitions, however, a possible alternative development of this tiny halt has been depicted.
Photos © Ian Atkinson
back to top
Bron Hebog
 (OO9: 4mm/ft scale, 9mm track gauge)
Why call the layout Bron Hebog? We were keen to capture not only those special cameos that pepper this part of the route, but also the dramatic landscape that frames the line. Yes, we have featured Beddgelert station but we a wider perspective and Bron Hebog is a name associated with the area around the second horseshoe and a small pre-railway mine alongside the railway.
Bron Hebog is about a sense of place, typified by watching a Garratt hauling up to 10 WHR coaches on the curving climb out of Beddgelert, over the massive embankments and through the deep rock cuttings.
This layout represents a unique modelling challenge. We were required to capture the many layers of narrow gauge history, back to the abortive earthworks and bridges from the initial early 1900s proposals, thesubsequent structures and groundwork of the first through line, the WHR of 1922 that overlay the original formation, and finally the FR’s restoration with its inevitable modern-day features! Modelling a railway that was still to be completed set some unusual demands in itself!

For more information, visit: http://www.bronhebog.blogspot.com
Photos © Rob Waller
Canalside Ironworks
 (1/50th: scale 6mm/ft, track gauge 9mm)
Canalside Ironworks is a fictitious location, supposedly somewhere in deepest Derbyshire but it could be in any industrial location in England around the 1920/30s period.
The actual layout is modelled in the rather obscure scale for model railways of 1:50th which equates to 6mm = 1 foot of reality. There are very few commercially produced model railway items available in this scale so virtually everything you see on the layout has been either kit adapted or scratch-built. The track gauge is 9mm between the rails and the loco motors/chassis are commercial produced ‘N’ mechanisms.
This layout has many operating features including a working incline, water wheel, pumping beam engine, pithead winding gear and a furnace blast engine, – see how many more you can spot.
For more information, visit: https://www.facebook.com/Canalside-Ironworks-806090326233570
Photos © David Atkinson
Crawton
 (OO: scale 4mm/ft, track gauge 16.5mm)
Crawton is the first layout built by a small group of individuals specifically for exhibition use. The concept was driven by a common interest in the BR Blue era, the purchase of Heljan 26 & 27’s and fitting these with the excellent Legomanbiffo sound, so a Scottish setting was therefore required.
An early railway was constructed northwards along the coast from Montrose towards Stonehaven but got no further than Inverbervie. When the main line was constructed from Montrose to Stonehaven and Aberdeen, it took an inland route leaving the Montrose to Inverbervie line as a stub with a gap to Stonehaven.
For our model purposes, we have assumed that the Inverbervie to Stonehaven line was completed (Crawton is an actual town midway between the two places) but given the sparse nature of the population in the area, the line was single track only with passing loops. Crawton is modelled to show just the north end of Crawton station and the loop, with the tracks merging into a single line to pass across a viaduct over the river Bervie on its way to Stonehaven.
Train services are the usual Scottish secondary type with short-formations of Mk1/early Mk2 stock, supplemented by the odd parcels, goods or engineers working. The station has a single siding used to lay over freight trains to allow a passenger train to overtake or for unloading the odd engineers train.
Trackwork is hand-built C&L on wooden sleepers with Tortoise point motors. Signals are Dapol with the motors replaced by model aircraft servos. Given the sparse population of the area and to reflect its wind-swept nature, there are few buildings, the station being from the Bachmann Scenecraft range.
For more information, visit: https://neepsendmrs.weebly.com
Photos © Chris Nevard/Model Rail
Drws y Nant
 (2FS: scale 2mm/ft, track gauge 9.42mm)
This layout will make its debut at Uckfield, East Sussex in October; this will be only its second public exhibition and its first north of London.
Drws y Nant is the follow-up to my previous layout Llangerisech, but this time very much based on a complete prototype. Drws y Nant is a passing station on the GWR Ruabon to Barmouth route, situated between Bala and Dolgellau in a wooded valley in Mid-Wales. As the only building left now is the station master’s house, the layout was built using many archive photographs as well as site visits to get the general lie of the land.
The track is built to 2FS standards using the 2mm Scale Association Easi-Trac plastic base for plain track and soldered PCB sleepers with etched chairplates for all the pointwork. The offset scissor crossing next to the level crossing was a unique bit of trackwork that gives the station a bit more interest than a simple passing loop. Point rodding is complete from 2mmSA parts and stock is a mix of scratch-built, kit built and modified RTR all with wheels to 2FS standard. The raised banking allows this to be shown to good effect. A Magnorail system animates the road vehicles and servos control most of the movements for points and signals, all operated via a Digitrax DCC system.
More information is shown on the boards at the front of the layout and we will be happy to answer other questions not addressed on these.
Photos © Nigel Ashton
Great White River Navigation , Extraction & Steam Packet Company
 (On30: scale 1/48th, track gauge 16.5mm)
The layout depicts a small backwoods town (Pikesville) in the Pacific North West area of the USA just after WW2. It is early spring and a recent snowfall is beginning to melt.
The scale is On30 – American O scale (1/48) stock running on HO track to give a 30” narrow gauge line. Geared locos such as the Shay, Climax and Heisler provide the main motive power interspersed with conventional steam and diesel units. Facilities at Pikesville are fairly simple to serve the depot and local industries. The ‘rest of the world’ is represented by a turntable storage board.
The layout measures 16’ x 1’6” and is presented in the proscenium arch style where you look into the layout rather than down on it. Operation is DCC. We control the trains and turnouts by i-pads and i-phones connected wirelessly through an edimax router to the main controller, an ESU ECoS unit. All the locos are sound fitted and the layout has some working features and ambient sound.
We operate at the front so please take advantage of the opportunity to chat to the team. We hope you enjoy our little layout.
Photos © Norman Raven
Harkness
 (EM: scale 4mm/ft, track gauge 18.2mm)
The Belford to Harkness Light Railway connected the East Coast mainline at Belford to the small seaside village of Harkness to the north of Bamburgh in Northumberland. The track layout of Harkness is based on the similar line which ran from Chathill to Seahouses, called the North Sunderland Railway.
The Belford to Harkness Light Railway left the mainline at Belford running towards and connecting with the Easington Quarry before heading to the fishing village of Harkness. The line eventually traced the original tramways from Brada Quarry to the sea, which ended at a stone jetty used for loading aggregate onto ships heading for the South and London. This jetty was expanded over the late 1800’s to form the current harbour and with it a more diverse trade. The line from Belford terminates at Harkness station with he original jetty railway line being removed and shortened back to form a small siding adjacent to the platform.
The layout features hand-built points with SMP plain track. Most buildings are scratch built from styrene sheet and are based on similar buildings in the area. Trains are run in various time periods: 1930’s 40’s or 50’s. Whilst the Light Railway possessed its own rolling stock and locomotives, it was common for the mainline railway company to supply locomotives and stock and to also run trains over the branch. Freight workings were to/from the mainline with much railway owned rolling stock for traffic such as fish, coal and acid, as well as some private owner wagons for coal and aggregates. The layout portrays a variety of these workings covering the LNER, Nationalisation and BR Periods using a mix of RTR and kit built items.
For more information, visit: www.rochdalemrg.wordpress.com
Photos © Tony Bucknell
Harlyn Pier
 (O: scale 7mm/ft, track gauge 32mm)
The layout depicts the terminus of an imaginary (ex LSWR) branch line on the north coast of Cornwall not far from Padstow in the BR period circa 1960. The station is set on a quayside that connects to a ferry service from the adjacent dock, similar to the arrangement at Lymington Pier, which was the inspiration for the layout.
The owner is one of the team that constructed Harlyn Road which has been successfully exhibited for more than 10 years. Harlyn Pier is in fact the often discussed harbour extension!
The trackwork is all hand built from TimberTracks/C&L/Exactoscale components with the majority of the buildings being scratch built and based on examples from the Cornwall or Devon area. The signals and level crossing gates are all operational and interlocked with the points.
The layout is run to a sequence which represents a busy summer Saturday but is in reality much busier than would have been the case in order to keep the public (and operators) entertained.
For more information, visit: www.harlynpier.weebly.com
Photos © Rob Cottrell
High Peak Ordnance Depot
 (OO: scale 4mm/ft, track gauge 16.5mm)
HPOD, like its well-known predecessor, Lulworth Camp Military Railway, is a semi fictional Ordnance (Stores) Depot. The Derbyshire stores depot was at West Hallam, but I have relocated it near to home at Parsley Hay, where the LNWR had realigned the track through the station but preserved the old C&HPR loop as goods sidings. This allowed stone trains to lie up waiting for access into the quarries and also for passenger traffic to pass by. After 1941 the military also had long trains passing though Parsley Hay with fuel tanks from the Dove Holes Petrol Depot and explosives trains in and out of RAF Harpur Hill both of which are represented on this layout.
Ordnance Depots have two main roles, firstly as a bulk supplies provider to the army during time of war and secondly as a holding base for the vehicles and stores for Territorial and Volunteer Reserve Regiments. The latter allows me to retain some of the tank trains from LCMR whilst introducing general freight trains. The layout can be exhibited with rolling stock and buildings of various periods, and at this exhibition will be in its 1960s, cold war, guise.
There are strict demarcation rules where the MoD lines join the BR line, and traffic is handed over to the military in the exchange sidings as mainline engines are not permitted to enter the army depot other than to access the troop platform.
People who remember the old LCMR will recognise the track layout and a few features, but all of the buildings and scenery are new and the analogue control system has been upgraded to DCC. The Military Railway uses hand-built flat-bottom Army-style track and includes a number of distinctive features of British Military Railways.
Photos © Rex Ashton
Hills of the North – the Spirit of Shap
 (OO: scale 4mm/ft, track gauge 16.5mm)
No OO gauge model railway could ever truly hope to capture the vast expanse of wild north country fells that are the setting for one of the country’s most iconic stretches of mainline railway – the formidable 1-in-75 climb to Shap summit on the West Coast mainline. The Spirit of Shap is therefore presented as vignette of this famous piece of railway, centred around the scene at Shap Wells, a location simply referred to by the late Ivo Peters as ‘classic’.
The layout takes three places on the climb of Shap Bank and blends them into one continuous scenic presentation some 35 foot long. In the uphill direction, trains enter the scene at the right hand end under the Greenholme road bridge. This then transforms into the ‘classic’ location as the railway runs along a prolonged embankment, crossing the road to the Shap Wells hotel. The majority of the viewing section is given over to this scene, allowing sizeable length trains to be positioned in the landscape. As the trains enter Shap Wells cutting, this in turn becomes the more sizeable cutting on the approach to Shap summit itself, passing beneath the distinctive lattice footbridge that takes a public right of way high over the railway. Emerging from the cutting, trains pass the sidings and signal box at Shap summit before disappearing off scene again.
 The layout is set on a gradient which represents the 1-in-75 incline so the trains really do have to work to make it past Shap summit. This includes the facility to recreate the banking arrangements for some of the heavier trains, with the banking engines dropping off at Shap summit before returning down the hill towards Tebay. The scenic work attempts to capture the bleak open moorland setting, with plenty of drystone walls (51 feet to be exact) but few trees. A graduated, forced perspective approach has been applied behind the mainline to blend into the backscene.
The layout is set in the pre-1973 era, prior to the electrification work that swept away the old steam age infrastructure. Various periods can be depicted – from 1950’s pure steam operation, with the West Coast mainline Stanier fleet still holding sway on a mixture of crimson/cream and maroon stock, through to the 1960’s transition era with a mix of steam and diesel traction and BR standard classes and blue/grey coaching stock in evidence. The layout is signalled with the correct (working) semaphore signals of the period, augmented by the Shap Wells intermediate block colour light signal.
For more information, visit: http://www.rmweb.co.uk/community/index.php?/topic/128568-hills-of-the-north-the-spirit-of-shap/
Photos © Tony Wright, Chris Nevard and Andy York
Hope under Dinmore
 (EM: scale 4mm/ft, track gauge 18.2mm)
This layout is inspired by the line between Shrewsbury and Hereford which was completed in 1853 and which, by 1871, was owned jointly by the Great Western Railway and the London & North Western Railway. Traffic on the line increased after the opening of the Severn Tunnel in 1887, and, after 1892, the conversion of broad gauge GWR lines west of Exeter meant that longer distance through services used the line.
Between Leominster and Hereford a station (Dinmore) was built to the south of Dinmore tunnel, but this was closed in 1958. The layout is based on a fictitious station that is assumed to be at the north end of the tunnel, close to the village of Hope-under-Dinmore.
Track is to EM gauge (18.2mm) using a mixture of C&L plain track and hand-built turnouts. Turnouts are operated by “Tortoise” point motors. Signals are based on LNWR design and are operated by “The Bouncer” system which utilises programmed model aircraft servos.
There are two signal boxes which are based on the signal box at Leominster. The station building is a mirror image of that at Dinmore, which still exists as a private house. The layout is set in the pre-grouping period 1904 to 1920. Trains are operated to a schedule and are a mixture of LNWR and GWR.
For more information, visit: https://www.shmrc.org.uk/club-layouts/hope-under-dinmore/
Photos © Railway Modeller, Craig Tiley
Kirkmellington
 (EM: scale 4mm/ft, track gauge 18.2mm)
A desire for a new challenge which would raise my level of modelling led me to an idea for a small end to end layout of a Scottish Colliery set in the early 1970′s. Kirkmellington is my first foray into hand-built point work, EM gauge standards and finescale modelling. The layout has been sized to fit in a normal family car which has restricted the size of the boards to 3ft by 2ft, and the track plan is the best compromise between realism and operational interest in the available space.
Kirkmellington represents a small colliery in the NCB Ayrshire area of Scotland. It is assumed to be on a single track branch line off the main G&SWR line from Carlisle to Kilmarnock that winds its way into the Ayrshire hills near Patna and Dalmellington. The branch line was once a through route towards Ayr but under the line closures of the 1960s it has been cut back to the next town (just beyond Kirkmellington) to enable the area’s colliery traffic to be still moved. This means that all traffic from Kirkmellington has to run east to the G&SWR mainline before continuing south for Carlisle or north for Ayr and Kilmarnock, thus giving the layout a mix of Scottish region and London Midland region based locos.
The colliery comprises exchange sidings onto the BR network, storage sidings and the washery screens where the mineral wagons are loaded. A through track connects the colliery with the tip, further up to the west. All main buildings are scratch built using embossed plastic sheet. The colliery headframe is temporarily a Bachmann Scenecraft product. Track is code 75 bullhead by SMP and points are hand built with timber & brass rivets. The working signals are by Dapol. To keep it interesting in terms of rolling stock, I am setting it in the period 1969–73, ie pre-TOPS, green and blue diesels with full and half yellow panels, working 16t unfitted mineral wagons. The private colliery rail network has a mix of ex-BR and industrial engines and a motley collection of wagons. Locos are mainly R-T-R from Hornby, Heljan, Bachmann and Dapol with the occasional kit-built example. Rolling stock is a mix of R-T-R and Parkside kits. Control is normally DCC but we can use DC analogue. Locos are fitted with a mix of Zimo and Loksound chips.
For more information, visit: http://kirkmellington.wordpress.com/
Photos © G Bucknell
Moors View
 (N: scale 2mm/ft, track gauge 9mm)
This layout featured on the front cover of the January edition of Railway Modeller this year. It is a representation of the former L&SWR route from Exeter to Plymouth which loops around the northern edge of Dartmoor, and Moors View itself is set somewhere between Lydford Junction and Tavistock North station. The centrepiece of the layout is the nine arch viaduct which has been built on a gentle curve. With the exception of the road vehicles, the layout is quite date neutral. This means that it is easy to run a wide range of stock and we plan to operate through a long period from 1950s steam through to early 1990s diesels.
Photos © Steve Flint, Railway Modeller
Pen-y-Graig
 (1/60th: scale 5.5mm/ft, track gauge 12mm)
Pen-y-Graig station is set somewhere in North Wales, on a narrow gauge line built to carry slate and minerals from mines and quarries in the district, to a standard gauge railway in a town some miles away. Set just outside the local village, the station serves a slate quarry on the hill above via a water balance incline from the station yard. A quarryman pushes wagons between the quarry and the head of the incline and controls its operation. There is an engine shed and workshop across from the station and next to the station building is a goods yard and coal merchant.
When construction started many years ago, the layout was almost completely scratch built, but now includes kit-built stock from the 5.5 mm Scale Association.
Photos © Barrie Johnston
Ryburn

(P4: scale 4mm/ft, track gauge 18.83mm)
This layout is making its debut at the exhibition.
Ryburn is the owners’ first foray into P4 finescale modelling and, like their previous layout, Calderwood (OO), which was shown at our 2015 exhibition, it is based on the Calder Valley route of the Lancashire & Yorkshire Railway and set in about 1910.
Most of the locos and other rolling stock is built from kits, with a few scratch built. The majority of the rolling stock saw service on Calderwood but has been fitted with new wheels and adapted to the more realistic, slightly wider track gauge of P4 standards.
Photos © Philip Sweet
Sherton Abbas
 (O: scale 7mm/ft, track gauge 31.5mm)
This layout has appeared in both Railway Modeller (Aug 2019) & Model Railway Journal no 278 (Spring 2020), but during lockdown it has been extended. This is the farthest north it has ever been exhibited.
Sherton Abbas is my 7mm scale representation of a Great Western Railway branch line terminus and is set in the Edwardian era circa 1905.
The name Sherton Abbas comes from Thomas Hardy’s novel “The Woodlanders”, quite what he would have made of my railway is anyone’s guess!
The buildings are scratch built from plastic card and are based on William Clarke designs. The track is built using wooden sleepers with chairs and rail from C & L products and is set to 31.5 mm gauge. The locomotives and stock are built from etched brass or plastic kits with compensated chassis running on wheels and axles from Slaters. The landscape was carved from Polystyrene sheet glued in position on top of the base boards. This substructure was then covered in a mixture of static grass fibres, rubberised horse hair and ground foam scatters.
For more information, visit: https://www.rmweb.co.uk/community/index.php?/blogs/blog/1131-wenlocks-blog/
Photos © David Stone
South Pelaw
 (EM: scale 4mm/ft, track gauge 18.2mm)
South Pelaw Junction was a key junction located on the railway that until 1984 ran between Tyne Dock and Consett. The prime purpose of this railway was to serve the blast furnaces and steel making plant at Consett although, being a coal mining district, coal and coke traffic was also very significant. South Pelaw was the start of a fierce climb up the valley through Stanley to Consett, with gradients as steep as 1 in 35. Because of this gradient, it was the point where banking locomotives were attached or heavy trains were split into smaller lengths because a single locomotive could not manage. South Pelaw was actually a junction where the much older Pontop and South Shields Branch (formerly Stanhope & Tyne) route to Consett diverged, this route utilising rope work inclines to haul empty wagons up the inclines. The route via Pelton, Beamish, Stanley and Annfield Plain eventually replaced this route but the old line was retained serving various collieries, washeries and coke works.
 Looking at the front of the layout on your right are the approaching lines from Washington and Tyne Dock (nearest to you) and Ouston Junction on the ECML. To your left the route to via Stanley is seen climbing at 1in 50 and curving away towards Consett. The six lines at the front of the layout are the former Pontop and South Shields route exchange sidings where traffic was worked in by large main lines locomotives and taken forward up the incline bottoms by smaller shunting locomotives, Stella Gill Flatts signalbox can clearly be seen with a NCB storage building behind it.
We have set the period around the late 1950s/early 1960s, so don’t be surprised to see some early diesel locomotives. The authentically recreated track layout features hand built pointwork with C&L flexi-track for plain line, hand built working signals powered by servo motors and authentic buildings and structures. Locomotives are kit built or RTR conversions, as is the wagon stock which are predominantly iron ore, coal hopper or steel wagons. A timetable controlled by a full time signalman is usually operated due the number of conflicting routes through the junctions, the timetable features many of the moves that you would expect to see during the course of an ordinary working day in this period.
For more information, visit: http://www.southpelawem.blogspot.com/
Photos © Tony Lambert
Teign House Sidings
 (S7b7: scale 7mm/ft, track gauge 49.2mm)
Teign House Sidings (pronounced “teen”) is a small broad gauge terminus in 7mm scale, built to Scaleseven standards. The Teign Valley Railway was authorised in 1863 as a broad gauge line, but was finally opened in 1882 as standard gauge to a freight-only siding at Teign House (a pub), near Christow.
I have assumed that the original scheme was actually built, with the broad gauge line to Teign House being worked by the South Devon Railway, followed by the GWR after the amalgamation of the west country railways in 1877. The layout is set in the last days of the broad gauge, circa 1887-1892, with the locomotives in their final forms and “convertible” wagons and coaches forming a fair proportion of the rolling stock, although some of the surviving genuine broad gauge stock can be seen. Trains are short, which is typical of the 19th century all over the west country, and usually hauled by 4-4-0 or 0-6-0 saddle tanks. The usual branch services are considerably augmented by mineral traffic from the basalt quarries near Christow.
This will be the layout’s final public appearance, after 26 years and 88 exhibition appearances.
Photo © Tony Wright
Thomas’s Christmas Surprise
 (OO: scale approx 4mm/ft, track gauge16.5mm)
Schhhhh!!! Don?t tell anyone, but it will soon be Christmas on the Island of Sodor. This means that the Fat Controller needs lots of trainee drivers to make sure that all the presents get to the right place.
For more information, visit: https://sas-railway.org
Picture © T Stubbs
Upper Cwmtwych
 (N: scale 2mm/ft, track gauge 9mm)
Upper Cwmtwych (come twitch) is a small depot for emergency servicing and refuelling of diesel locomotives. A wide range of loco classes can be seen belonging to a variety of different Train Operating Companies.
Track is Peco 55 with points operated by Tortoise point motors, which also change track polarity. All scenics, buildings, trees etc are scratch built. The signal box was salvaged from a previous layout.
If you have any questions, please ask one of the operators and we will do our best to answer them.
Photos © Tony Wright
White Meadow Quarry
(N: scale 2mm/ft, track gauge 9mm)
Set around 1966 (ERA 5) White Meadow Quarry is an N gauge model railway layout set in a fictitious location somewhere in the South of England. Located a little way outside the village of White Meadow, the railway serves a chalk quarry as well as the village. At the time of the layout, the chalk quarry is coming to t

he end of its life and is very run-down – almost derelict. A main line station sees fairly regular rail traffic, while the branch line brings materials into and out of the chalk quarry as needed. The quarry workers keep the local pub going – although today it’s doing a roaring trade because there’s a Bus Rally taking place on the common near the station.
For more information, visit: https://www.whitemeadowquarry.com/
Wickwar
![]() (N: scale 2mm/ft, track gauge 9mm)
(N: scale 2mm/ft, track gauge 9mm)
Wickwar is a small town on the important secondary main line between Bristol and Gloucester; modelled as it was around the early 1950s. The small goods yard was removed in 1963 and the station was closed in 1965, though the line is still heavily used. As well as local trains, there were many long distance expresses with destinations such as Plymouth, Bournemouth, Manchester, Bradford, and Newcastle. Goods trains were mostly to or from Bristol or Avonmouth docks. Motive power was mainly LMR tender locos, e.g. 4Fs, Jubilees, and Black 5s, with a few GWR and (later) LNER locos. We aim to reproduce a typical selection of trains and stock for the time.
To the south-west [left as seen] the line comes out of a tunnel and along the side of a valley; to the north-east[right] it starts to cross the valley. There is a 30m height difference between the highest and lowest parts modelled (8” in N) so open plan baseboards have been used, built from Styrofoam sandwiched between 3mmlayers of Gaboon ply. Styrofoam has also been used for the scenery, covered with a layer of Sculptamold. All the buildings are scratch built, many from printouts of photos of the current buildings. The station building, designed by Brunel, was unique due to the narrow space. Next to the tunnel is the large brewery, built by the railway company to replace existing breweries whose water supply the tunnel cut through. At the period modelled it had become a cider factory, which later closed but has now reopened as the Wickwar Brewing Company. The backscene was “Photoshopped” from photographs of the real location and printed on vinyl.
Each of the 2 tracks can operate on DC or DCC, selected when the layout is set-up. The small goods yard only had 1 train per day; to do any shunting necessitated blocking both main lines. The fiddle yard has 3 roads in each direction, each divided into sections so that 24+ trains can be stored. The movement of trains in the fiddle yard is automated using MERG Train On Track (TOTI) detectors which work with both DC and DCC. The boards and control panels are connected via a MERG CBUS system. Points, signals, and the car system are controlled by servo motors in MERG mounts, the signals are operated automatically as trains pass.
Video cameras display views of the layout on screens at each end. Lorries and buses run along the front using the Faller moving vehicle system (internal battery), with loops acting as a fiddle yard storing vehicles at each end. The lady at the station puts her arm out to stop the bus! A third of the time the lights are turned down to provide a dusk running mode: trains have illuminated head and tail lights and illuminated carriages. Lighted signals and several of the buildings, and a bus with headlights.
For more information, visit: https://farnhammrc.org.uk/?page_id=390
| Layouts | Traders | Our New Venue | Directions |
| Tickets | Children’s Activities | Other Exhibitors | Other Attractions |